"Ive tried then but they dont work for me",is the usual refrain of walkers who have bought poles,but never bothered to learn how to use them! Hardly suprising as this most purchased of mountain tools has very little written on their correct use.
As a result one can observe some of the most expert of mountaineers with the latest shiny super-pole,floundering around like a pig with a musket getting very little out of his sticks.
Poles have only two functions when used for walking-1:Balance.2:Propulsion.There are lots of improvs- of course,bivvy support poles,buried snow anchors,etc,but those are the primo uses.If your using them just to support your weight dont be suprised if they collapse on you.Since the excercise form of Nordic Walking arrived on the scene a few years ago.There has been a great deal of good scientific research on the benefits of poles,and much of this is applicable to standard Walking Poles.It should be remembered though,that Nordic Walking Poles are designed for that particular excercise only, and are completely unsuitable for Hiking or Mountain Walking.One of the off-shoot benefits from Nordic Walking is the LEKI SILENT SPIKE,a small rubber boot covered in ultra-grippy titanium pegs that fits on any standard pole tip.
Use this method when putting them on and they wont end up back to front on your poles.
When your done,"do not" cut the loose end of strap away,just fold and electrical tape it to the strap itself.You may want to extend the strap in future to take chunkier gloves or mitts.
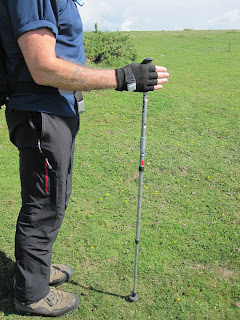
Apart from secondary uses as ski-poles,bivvy-poles,or dagger-picks on steep ground,they should only ever need to be adjusted to your personal length.Stand upright and extend your forearm(only)from the body at 45-degrees.Your pole length is from where it fits snugly in your grip,too where the tip touches the ground.Make sure each extendable section is of equal length to get the maximum strength and support out of the pole.Then mark in your personal graduations as previously mentioned and "robs your uncle",thats your length!
Poles have only two functions when used for walking-1:Balance.2:Propulsion.There are lots of improvs- of course,bivvy support poles,buried snow anchors,etc,but those are the primo uses.If your using them just to support your weight dont be suprised if they collapse on you.Since the excercise form of Nordic Walking arrived on the scene a few years ago.There has been a great deal of good scientific research on the benefits of poles,and much of this is applicable to standard Walking Poles.It should be remembered though,that Nordic Walking Poles are designed for that particular excercise only, and are completely unsuitable for Hiking or Mountain Walking.One of the off-shoot benefits from Nordic Walking is the LEKI SILENT SPIKE,a small rubber boot covered in ultra-grippy titanium pegs that fits on any standard pole tip.
Leki Silent Spike.
For the slippery,algae covered rocks of the UK,they are the equivalent of having crampons on your poles.They are all very grippy and quiet on any hard or flat surface,hence the name "Silent Spikes".Ive been using them for some years in tandem with "Grivel Spiders" on my boots for high-alpine Swiss paths,and icy British paths in winter conditions. They are no substitute for crampons in heavy going,but its amazing what they will get you over when you dont feel like lugging the ironmongery.
Fitting Spikes.
Curved surface toward you.Handle Strap facing away.
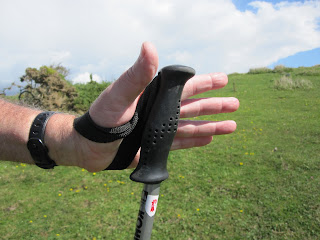
The biggest mess people make with sticks is adjusting the hand straps and pole-length correctly.The strap is simple,you just put your hand in the loop and tighten enough to get the position depicted below.
A good strap length will enable a well supported handle grip.
One of the most irritating things in my "mountain-pain in the bum" list,is being in a group that has to hang about in a freezing wind.While the other half of the group are poking each others eyes out,trying to adjust poles useing the barely visible graduations on the stick.Theyve usualy forgotten the measurement and get the length all wrong.Then they get flustered because they are driving everybody else bat-shit with their fumbleing and frequent readjustment stops!Heres the simple way to do it that solves all those probs,and makes you look like a mountain god.
Mark pole length with indelible pen.
Go to a stationary shop for a black(colour of choice)indelible felt tip pen.Adjust and equalise your pole sections to your specific length (see adjust pic below)and mark a clear visible circle around all sections at the point of locking.Let it dry for ten minutes them fold them away,and all your problems (And mine!)are solved!
(If youve read this blog,and havent done this when I meet you on the hill.I might have to kill you!) Once done,you only have to redo them once every winter.
Finding your correct pole length is dead simple,because there is only "one" correct pole length for you.All this stuff about adjusting pole length according to steepness of ground,and terrain is total bollocks!The pole manufacturers dont help this mythology much by constantly adding printed micro-graduations to their products.
Extended forearm to the ground,is your correct pole length.
For further instructional tips go too- www,farsightmountainventures.com (training page).Or watch out for part:2 of this blog coming soon.
Good climbing,
Rob.


